
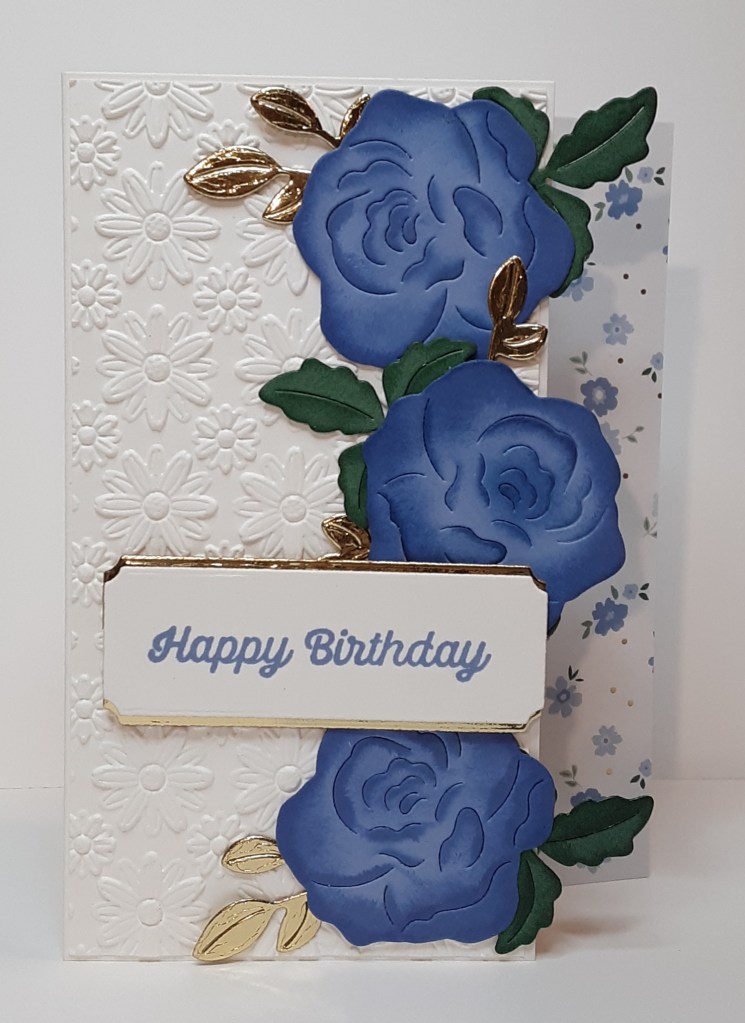
It’s Wednesday and today I have a fun fold card using the Bloom Boutique dies for my focal image. I used the dies because I couldn’t get a clean stamped image of the roses in the stamp set with my new ink pad. We are about halfway through July (can you believe time is flying by so fast!) and we have about a month and a half with our current catalog. The new catalog begins in September, so if there is anything you really want in the current catalog, now is the time to act. The Last Chance list will be updated in August and when supplies run out, they are gone. Now on to the card.
To make the card base, I cut a piece of Thick Basic White cardstock to to 5½” x 7¼” on my Paper Trimmer, scored and folded at 4¼”, and burnished with my Bone Folder. It doesn’t fold in half and this is the fun part. I cut a piece of Bloom Boutique DSP to 5½” x 1¼”. I glued this piece to my card base using my favorite adhesive (Multipurpose Liquid Glue or Stampin’ Seal) on the inside of the card along the right edge.

I cut a piece of Basic White cardstock to 3″ x 5½”. I ran this through the Lazy Daisy Embossing Folder on my Stampin’ Cut & Emboss Machine. I trimmed it down to 2⅞” x 5⅜”. I adhered this piece to the front of my card.

With Hydrangea Hue cardstock, I die cut three roses from Bloom Boutique dies (get the bundle here). With Peaceful Pine cardstock, I die cut four sets of leaves. These dies have cuts in them that help give dimension.

To accentuate the dimension on the roses, I added ink with a Sponge Dauber and Hydrangea Hue ink. To facilitate adding ink to the interior cuts, I made a tool from a piece of clear plastic packaging. I cut a triangle with one square angle and two acute angles, one narrower than the other. I inserted the narrow end into the smaller cuts and applied ink. I did add additional ink around the edges. I added some Easy See tape in one corner so I could find it more easily. Just wipe the ink off and use it again. Works much better than a Post-It note.

I did add additional ink to the edges and outlying petals for more dimension. You can always add more ink, but you can’t remove it once it’s down. I inked the leaves the same way with Peaceful Pine ink.

I die cut two of the leaf branches from Gold Foil Sheets. I did cut these apart before adding them to my flowers. I added my flowers to my card. I placed them on my card before gluing to make sure I liked the positioning. Part of the flowers hang off the edge of the card, so be careful not to put glue on the parts that hang over. Since the flower backs can be seen from inside the card, you may want to cut white pieces to back the flowers and leaves. I chose not to do this.

I stamped Happy Birthday from BBQ Masters stamp set in Hydrangea Hue ink. I die cut it out with the label die from Words & Wishes die set. I cut an additional label from Gold Foil Sheets. I cut the gold one in half lengthwise and offset it on the label.

I added the sentiment to my card with Stampin’ Dimensionals.

You could add some gems to give the card a little sparkle.;
To finish the card, I stamped a greeting inside the card.
I hope you liked this fun fold card!
For the complete supply list, click here.
For further inspiration:
Images © Stampin’ Up!

