Happy New Year! Marilyn, here! With the start of the year also comes Stampin’ Up’s best promotion of the year – Sale-a-bration! The card I’m showcasing today uses a Sale-a-bration set that is FREE with any purchase of $120 or more of product (before tax and shipping) from the new January – April Mini-Catalog, the Annual Catalog, or Online Exclusives! The promotion begins on Tuesday, January 7, 2025 through February 28, 2025. If you need either catalog, just stop by the shop and pick one up! You can also view the catalogs online. The mini-catalog and Sale-a-bration catalog go live on January 7. Now on to the card.
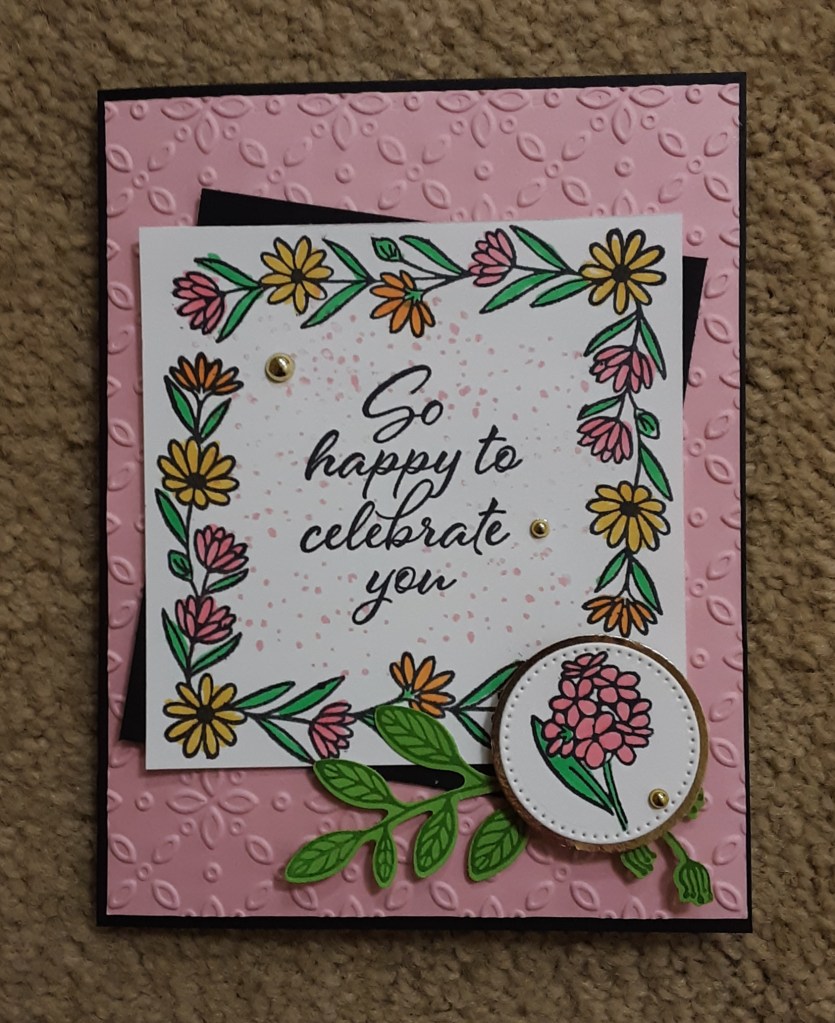
To make the card base, I cut a piece of Basic Black cardstock to 5-1/2″ x 8-1/2″ on my Paper Trimmer, scored and folded at 4-1/4″, and burnished with my Bone Folder. Next, I cut a piece of Pretty in Pink cardstock to 4-1/8″ x 5-3/8″ and ran it through my Eyelet 3D Embossing Folder on my Stampin’ Cut and Emboss Machine. I cut a piece of Basic Black cardstock to 3-1/2″ x 3-5/8″ to use as a matte. I cut a piece of Basic White cardstock to 3-1/2″ x 3-5/8″, also.
On the Basic White cardstock piece, I stamped the smaller floral corner image from Corner in Bloom stamp set in Momento Tuxedo Black in the corners, twice, to form the rectangle of flowers. I stamped the greeting from Layering Leaves stamp set in the middle of the bordering flowers in black ink. I stamped the spatter image with Pretty in Pink ink randomly over the sentiment. I colored the floral swag with Stampin’ Blends: Daffodil Delight, Peach Pie, Pretty in Pink, Granny Apple Green, and Lemon Lime Twist. With my Paper Snips, I fussy cut around the outside of the image. I glued this onto the black matte piece with my favorite adhesive (Multipurpose Liquid Glue or Stampin’ Seal).
I adhered the Pretty in Pink piece to the front of my card base leaving narrow borders all around. The embossing folder can change the dimensions of your paper, so you may want to re-measure and cut your paper accordingly. I just went with it. I adhered the focal image at an angle, slightly closer to the top of the card.
I stamped the smaller floral image that matches my floral swag on a scrap of Basic White cardstock and colored it in with Stampin’ Blends. I die cut it with the second smallest circle from the Stylish Shapes die set. I punched a 1-3/8″ circle from Gold Foil sheets. I adhered the two circles together using the gold circle as a matte.
I stamped two leave images in Granny Apple Green ink from Layering Leaves stamp set on a scrap of Granny Apple Green cardstock. I used the Bough Punch to punch out the leaves. I adhered the punched leaves to the back of my circle. I used Stampin’ Dimensionals to adhere this to the lower right-hand corner of my focal image.
For a little extra pizzazz, I added some gold pearls from the Blooming Pearls pack.
To finish the card, I stamped a sentiment on a piece of Basic White cardstock and glued it inside my card.
I hope you enjoyed this card!
For a complete supply list, click here.
I played with this card with a couple friends and Becky came up with this one: