
Hello! Marilyn here. Now that we are officially enjoying the fall season, I thought this colorful card, that was inspired by the fall foliage, would be a good choice to profile.
I started by cutting a card base from Basic Black cardstock to 5-1/2″ x 8-1/2″ using my Paper Trimmer, and scoring and folding at 4-1/4″, burnishing the fold with my bone folder. To make the background, I cut a piece of copy paper to 4″ x 5-1/4″. Then, I glued 1-5/16″ x 4-1/4″ strips of Poppy Parade cardstock, Pumpkin Pie cardstock, Garden Green cardstock, and Pretty Peacock cardstock to the copy paper, leaving no gaps. I used my favorite adhesive (Multipurpose Liquid Glue or Stampin’ Seal). I trimmed the sides to even them up, to a width of 4″. I glued this to my card base, leaving a 1/8″ border.
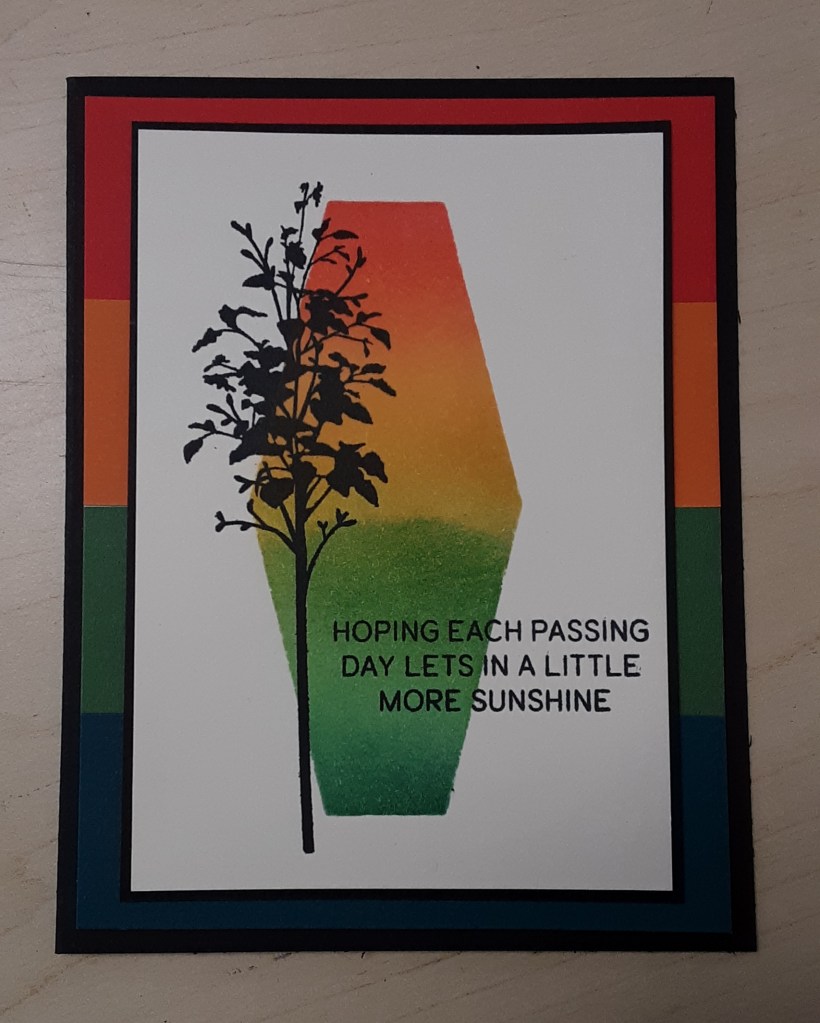
I cut a piece of Very Vanilla cardstock to 3-5/16″ x 4-3/4″. (Sorry about all the 16ths; you can round up or down and adjust your other measurements.) Using my Nested Essential dies, I cut a stencil using the 3-3/8″ long hexagon die using my Stampin Cut and Emboss Machine. You can cut this from masking paper, large Post-It note, or a piece of clear packaging, which you can save and use over and over, and has the added advantage of being see through. I like to put my blank cardstock on a sticky mat and then positioning the stencil on it, with the edges of the stencil sticking to the sticky mat. This keeps my stencil secure while I ink blend. The hexagon shape should be even top and bottom and a little to the left. Beginning at the top, I used my Blending Brush to add Poppy Parade ink. Next, I added Pumpkin Pie ink, making sure to overlap the colors to make a smooth transition. I followed this with Crushed Curry ink, Garden Green ink, and finally, Pretty Peacock ink, blending the colors as I go. When applying the ink, make sure you start off of the paper, so you don’t get a blob of intense color. You can always add more, but removing it is a lost effort. I removed my stencil and then my cardstock from the sticky mat. I stamped the long floral image from the Delicate Forest Photopolymer stamp set in Momento Tuxedo Black ink to the left of the blended image. I stamped the sentiment from the set.
I cut a piece of Basic Black cardstock to 3-7/16″ x 4-7/8″ and mounted my stamped and blended image to it. I like to use Multipurpose Liquid Glue to give me a little wiggle room since my borders are so narrow. I glued this to my card base, centering side to side and top to bottom.
I hope you enjoyed this colorful card!
For the complete supply list, click here.
Here is another card using the Delicate Forest stamp set and color blending.

